HTTP Injector Maintaining your privacy on your mobile phone
So you’ve heard all those stories about the NSA surveillance, Government-sponsored hacking; well, even the open Wi-Fi networks at restaurants and public libraries are vulnerable.
To protect yourself and your browsing data from prying eyes, you’re probably already using a VPN on your laptop. | HTTP Injector
But then you ask, what about my phone? What about when I get that Instagram notification while I’m out and about?
- How to Hack WiFi Password from Android Smartphone – 2022 Tutorial
- What are the Most Critical Android Application Vulnerabilities
- Craxsrat v3 Latest 2023 Android Remote Access Tool free download
If you’re like me, you’ve already tried configuring a VPN service on your phone. And I say tried because these services tend to provide you with a .ovpn file, you know, for OpenVPN;
but then you install it to no avail. Or maybe it works just fine. But, then again, you wouldn’t be reading this if it did.
So, what can you do? Is there an alternative to OpenVPN? Are mobile users left to their own devices, forever to be surveilled whoever is connected to the same open network they are? | HTTP Injector
Enter HTTP Injector. A universal SSH/Proxy/SSL Tunnel/Shadowsocks client that encrypts your connection data so you can browse the internet privately on your phone, | HTTP Injector
without the hassle of not knowing if that .opvn file will be compatible with your very unique model of Android device. And, guess what? You won’t even need to root your device.
Installing the App
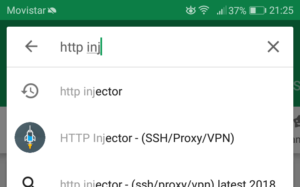
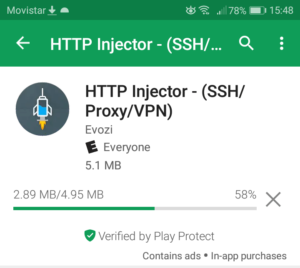
To download the HTTP Injector app on your Android device, simply go to the Play Store and search for HTTP Injector, the app’s logo should appear as you type.
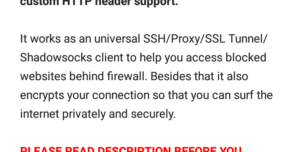
Once in the app’s Read more section, if we look at the description, we find that it also helps users circumvent certain website restrictions; say, if their local network is behind a firewall. | HTTP Injector
This may pose certain security risks, depending on where you browse, so just take that into consideration and be careful which websites you visit.
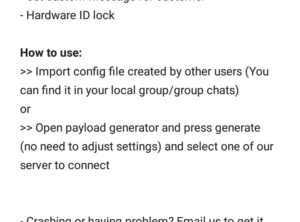
Scrolling further down, you will notice it provides instructions an overview on how to configure the app. We will elaborate on the procedure later in this tutorial. However, it’s good to know that it’s available for everyone, in case you need summary of what needs to be done.
Once reviewed, the app can be installed by clicking on Install, just as with any other Android application. Notice it’s not too large, considering it consumes approximately 5 MB of storage.
First-Time Usage
If you launch the app for the first time, you’ll be met with the following notification.
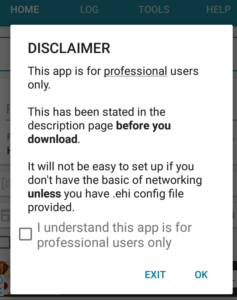
Don’t let the professional part intimidate you. If you follow the steps in this tutorial, you’ll be able to use it safely in no time. So, feel free to check the box next to I understand this app is for professional users only and click OK. You will then be greeted with the main application window.
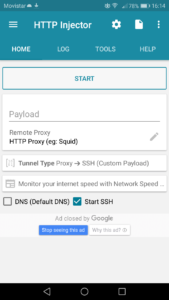
Before clicking on START for the first time, we need to configure some settings to ensure that network traffic is encrypted via the HTTP Injector app. According to the documentation for the Android app, there are 3 basic methods by which we can use the application.
- Using the built-in SSH client
- Using the IPTables mode and connecting a third-party VPN app to the HTTP Injector proxy address
- Configuring your ISP’s Access Point Name (APN) into the app, and then using the localhost address (127.0.0.1) with port 8989 as the proxy for all connections.
We will be focusing on the first method, with the built-in SSH client, mainly because of how easy it is to configure. A little disclaimer, though. We will be demonstrating the use of a free server which,
according to the app, restricts the use of BitTorrent clients to prevent saturation over the network. Therefore, we would advise against torrenting while connected to the SSH tunnel, to help maintain a fast network for all users who choose to use the same server as you.
Configuring HTTP Injector
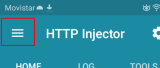
First, open the sidebar menu by tapping on the menu icon near the top-left corner of the screen.
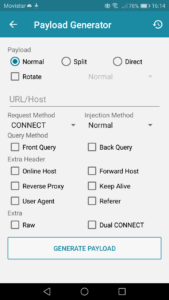
Here, we’ll first need to use a payload generator, which will help create the configuration file which is required for the encrypted connection to work.

From here, you’ll notice a bunch of options that allow for fine-tuning your connection settings. Choosing the Normal payload should work for most uses. Unless you know what you are doing, and have specific requirements you need to have met, we recommend to leave the default settings and click the Generate Payload button at the bottom of the screen.
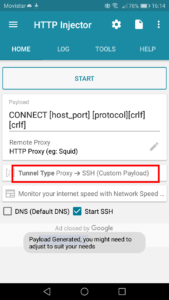
You’ll get a pop-up notification, letting you know the Payload has been generated. Notice the Payload field has been populated with the custom template. Notice how the Tunnel Type field denotes that we’ll be using an SSH tunnel to encrypt all traffic.
Next, we need to select a server to which we will connect through the SSH tunnel. That way, all traffic will appear as if coming from that server. | HTTP Injector
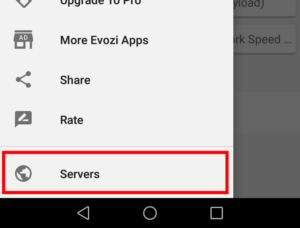
We can set it up by, once gain, tapping the sidebar menu icon on the top left of the screen. Here, we need to scroll down and select the Servers option.
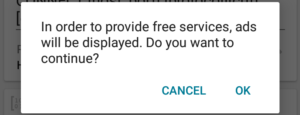
You will get a pop-up prompt letting you know that the app will display an ad, in order to provide free services. Click OK and feel free to skip the ad once the option to do so shows up.
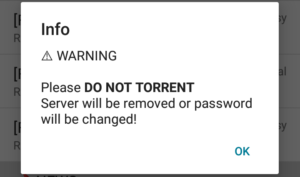
You will also get a pop-up warning requesting that you please refrain from torrenting while using the app, in order to prevent the server from being removed, or its password from being changed.
The screen will then display a list of free servers available for use with the HTTP Injector Android app. Notice how on the right side we can check the status of each server, to see whether it’s Busy or if it’s under Normal load.
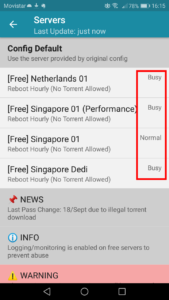
For this example, we will select the Singapore 01 server that is under normal load, by tapping on it. Upon selecting, we need to enable the Remote Proxy and Secure Shell (SSH) options for it.
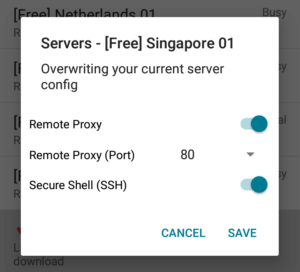
It’s okay to leave the remote proxy on port 80, as this would be the default one set for this particular server. Once all settings resemble the above screenshot, feel free to click on the Save button.
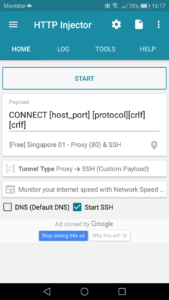
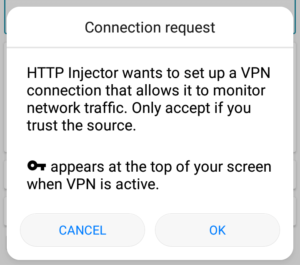
Finally, all we need to do is click the START button. Notice the pop-up requesting for your permission to set the VPN connection.
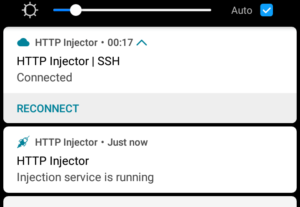
Notice how there is now a key symbol near the clock on the top-right corner of the screen, the HTTP Injector icon near the carrier name, as well as the new notification in the slide-down panel.
![]()
Testing the configuration
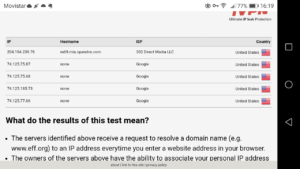
To wrap things up, let’s perform a quick DNS Leak test to find out whether our connection is encrypted successfully or not. For that, we can use the website dnsleaktest.com to verify this.
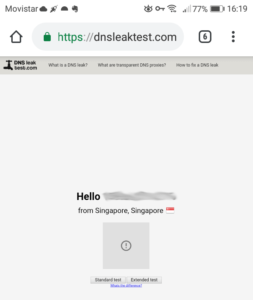
Here, we can see that our connection appears as coming from Singapore, just as expected from the server we chose. Feel free to click on the Standard test option at the bottom of the page.
Once the test is done, we can see that our Domain Name Service (DNS) data comes from servers located in the US, as shown in the screenshot below.
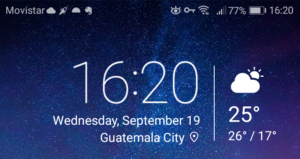
For full transparency, here’s a screenshot of my current homescreen, showing my current location, at the moment of writing this tutorial.
Conclusion
In conclusion, you can see how all traffic is indeed encrypted, and appears as if was generated from the server located in Singapore; all thanks to the Secure Shell (SSH) tunnel created with the help of the HTTP Injector Android app.
Remember, though, that this is just one of the methods available for using it. So feel free to experiment with the other options available through the app.